

R365 is integrated with Bar-i which allows you to increase the accuracy of your beverage inventory by looking up items using their existing barcodes and weighing open items using Bluetooth scales at a cost of $40/ month. You can then import the counts directly into Restaurant 365. This article provides instructions on how to perform the setup process in R365 and also the steps required to import your Bar-i inventory into an R365 Stock Count each time you count. Please note these instructions are suitable for users whose beverage inventory items are already setup in the R365 system. If your beverage inventory items have not yet been created in the system as Purchased Items, please contact Bar-i to discuss creating the Purchased records using a bulk import using R365’s import tool.
Setting up R365 inventory for use with Bar-i requires 3 setup steps and then step 4 is the actual importing
Step 1- Export your inventory counts from Bar-i using the Restaurant365 export template
Step 2- Update the R365 Purchased Items & Validate the UoMs
Step 3- Setup your Bar-i inventory count template in R365
Step 4- Importing your Bar-i Inventory Counts into R365
Follow the detailed steps below to setup importing from Bar-i
Step 1- Export your inventory counts from Bar-i using the Restaurant365 export template
In order to export your inventory counts into R365, you must first change the export profile within the Bar-i settings. Selecting the one of the two Restaurant365 export profiles within the Bar-i software ensures the data is exported in the correct format after each count. For Speed Count users you must select "Export to Restaurant365(Vessel)". For Pro users you can select either a) "Export to Restaurant365(Vessel)" or b) "Export to Restaurant365(Product)". The difference with option "b" is that if you sometimes have different-sized bottles of the same product (i.e. you have both 750ml and 1 liter bottles of Jack Daniels) the software will collapse the different sizes into a complete count for the Product. Additionally, if you use pre-batching of cocktails option "b" will handle this in a more seamless and intelligent way. One thing to note with option "b" is that you cannot export the count details until the Analysis step has been completed. If you have questions please contact your Bar-i Account Manager but the short version is that Speed Count users must use option "a" and most Pro users should select option "b".
- Sign into Bar-i using your login details at https://app.bar-i.com/ (note you cannot modify this setting in the downloaded device version)
- Select the “Settings” menu option on the left side
- Scroll down and select the “Integration” option
- Select the correct radio button labeled either a) "Export to Restaurant365(Vessel)" or b) "Export to Restaurant365(Product)"
Once you have selected the R365 export profile within settings you are ready to export your inventory counts from the Bar-i system
- Within the Bar-i software, expand the “Products” menu option by clicking on the left
- Select the “Integrations” option under the expanded Product menu options
- (In rare cases, integration values may already exist in R365 for your Purchased Items under the “Number (optional)” field. Simply copy these values into the “Integration Value” column of the Bar-i software Integrations page.)
- For most users, the “Number (optional)” field of the Purchased items in R365 will be blank. On the Bar-i Integrations page, click the green slider switch near the top right corner. This will populate the “Bar-i Vessel Id” for each inventory item in the far right column. The Bar-i Vessel ID is a unique identifier that allows inventory items in the Bar-i system to be matched with the Purchased items in R365.
- Click the red “Export” button near the top right of the screen and the Export will be downloaded.
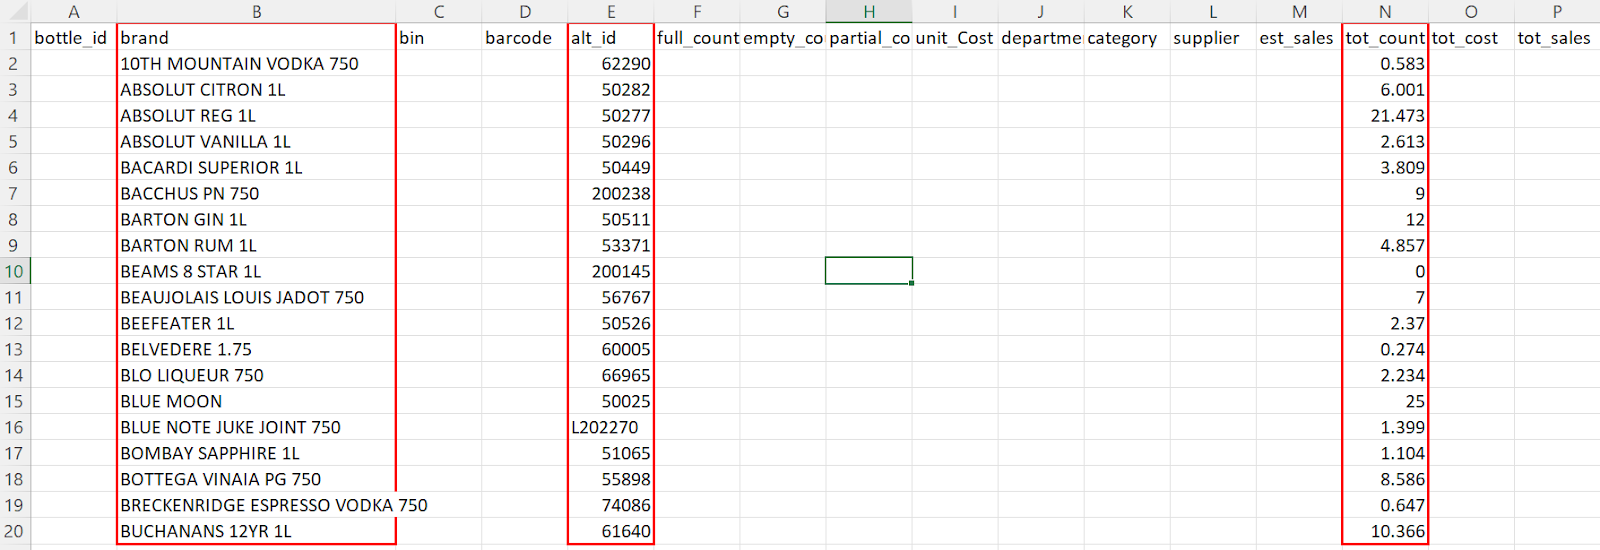
- Note the layout of the inventory count export with 3 columns being populated and the other columns being blank
- If you require additional guidance in a video click this link
brand- shows the name of the Bar-i inventory item
alt_id- is the unique value which is used to match the Bar-i inventory item to the R365
Purchased item
tot_count- is the aggregated item count which will be imported into R365 after counts
Step 2- Update the R365 Purchased Items & Validate the UoMs
In order for the completed counts to be correctly imported into the R365 system, we use the Bar-i Vessel ID (listed in the column named “alt_id”). This unique value tells the system which Purchased item to assign each total count to. This functionality is enabled by entering the alt_id values from the export into the Purchased Item record in the R365 system. This can be done either manually or via a bulk import.
Option 1: Manual Entry
- Open the Purchased Item record in the R365 system
- Copy the value from the “alt_id” column of the Excel export file into the field named “Number (optional)” of the purchased record for each item

Option 2: Bulk Import
Use Restaurant365’s Import Tool to perform a bulk update of the “Number (optional)” field of each Purchased Item record in the system. In order to perform a bulk update using this method, use the guidance provided on this Import Tool page. If you require additional guidance on using the Import Tool, this article provides a worked example using Employee Records.
In order to be able to successfully import the inventory counts from Bar-i into the R365 system it’s necessary for every item to have a correct and corresponding value in the Purchased Item records. Once that has been completed, the Purchased Items are ready to be used to create the R365 Stock Count Template.
Validate the UoMs
Since the item counts of each item will be imported from Bar-i to R365, it’s important to ensure that the units of measurement (UoMs) match in the two systems. For example, the counts for bottled beer items in the Bar-i system are for individual bottles. This means a single case of Budweiser bottles will be listed as 24 bottles. It’s important to confirm the UoM for bottled items in R365 are the same unit (bottles not cases). If the UoMs in the two systems do not match then 24 bottles could be imported as 24 cases which would obviously cause errors. In order to validate the UoMs check the “Inventory U of M*” field of the Purchased Item record under the “Inventory Cost” header as shown below:

Step 3- Setup your Bar-i inventory count template in R365
The final step in the setup process is to create an Inventory Count Template within R365 that will be used to import the counts. By creating a dedicated template to be used for the Bar-i imports only, we can ensure correct settings are in place which simplifies the import process each week. In order to setup your dedicated Inventory Count Template for Bar-i imports, please refer to this help article which provides detailed instructions. Additional guidance on the specific steps involved in creating your Bar-i Inventory Count Template is found below:
Create Your Inventory Template
- On the R365 help page scroll down to the section titled “Create an Inventory Template”
- Populate the four required fields (Name, Frequency, Location and GL Posting) by following the instructions.
Add a Storage Location and Inventory Items
- (Since the Bar-i export file contains aggregated counts for the entire bar it is only necessary to create a single Storage Location.) Create a single New Storage Location and name it something like “Full Beverage Inventory”
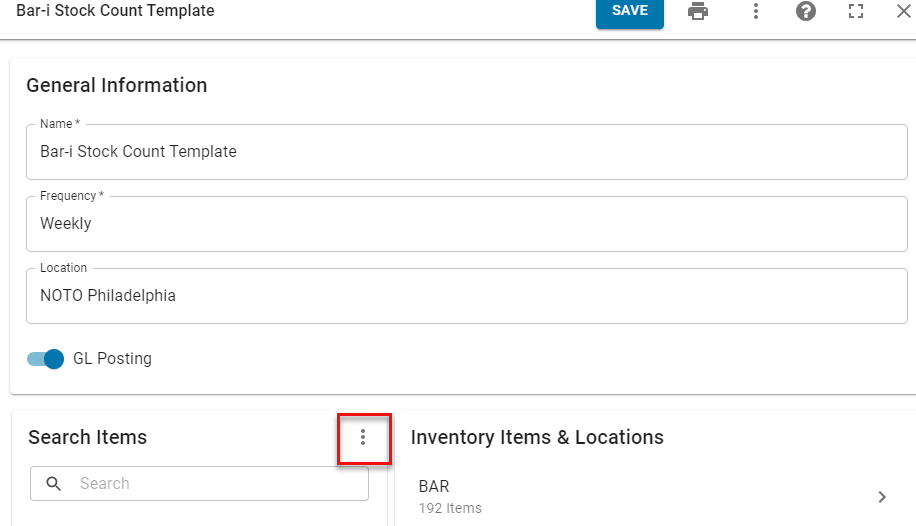
- (While items can be manually added one by one, the fastest way to add the Inventory Items is by using the Search function and adding items by Category) Click the three vertical dots (elipses) next to the “Search Items” label. This is shown in the red box in the image below.
- After selecting a Category and Storage location the number of items in that Category will be listed as a bulk “Add” option in the bottom right corner of the menu.

- Once you have added the inventory items to the Template click the blue
“Save” button near the top right of the screen to save your work. - Congratulations. You are now ready to import inventory counts.
Step 4- Importing your Bar-i Inventory Counts into R365
In order to use the Bar-i/ R365 inventory integration each period, you will complete each count within the Bar-i software. The counting data will then be exported from the Bar-i system into a .csv file with a special format that can be read by the R365 system. In the final step you will import the data into the R365 system using the Import Count feature of the Inventory Template you created during the setup process.
Step 1: Perform a Complete Inventory Count in Bar-i and Export the Count Data
- Perform your inventory count within the Bar-i software, ensuring you complete the process by clicking the “Finalize Count” button at the end.
- Within the Bar-i software, expand the “Products” menu option by clicking it on the main menu on the left
- Select the “Integrations” option under the expanded Product menu options
- On the Bar-i Integrations page, click the green slider switch near the top right corner. This will populate the “Bar-i Vessel Id” for each inventory item in the far right column. The Bar-i Vessel ID is a unique identifier that allows inventory items in the Bar-i system to be matched with the Purchased items in R365.
- Click the red “Export” button near the top right of the screen and the Export will be downloaded.
- If you require additional guidance in a video click this link and watch the video from 40 seconds.
Step 2: Open up the Export File and Sanity Check it for Accuracy
In order to avoid errors that can be costly in terms of your time, we recommend opening up the file you exported in the previous step and checking it for accuracy: Ensure that columns B, E and N of the file are populated with the correct information. Perform a couple of spot checks where you confirm that the total count (“tot_count”) listed makes sense. Finally ensure that the total number of inventory items listed reflects the number of items you counted.
Step 3: Import the Data into R365 using the Inventory Count Template
- In R365, navigate to the Inventory page and select the Templates tab near the top left of the page
- Click on the name of the Bar-i template you created during the setup process. This will cause the sidesheet to open.
- Near the top right click on the three vertical dots (ellipses) and choose the option named “Use Template”. This is shown in the image below.

- Click the blue “Review” button near the top right of the screen. The resulting screen is shown below.
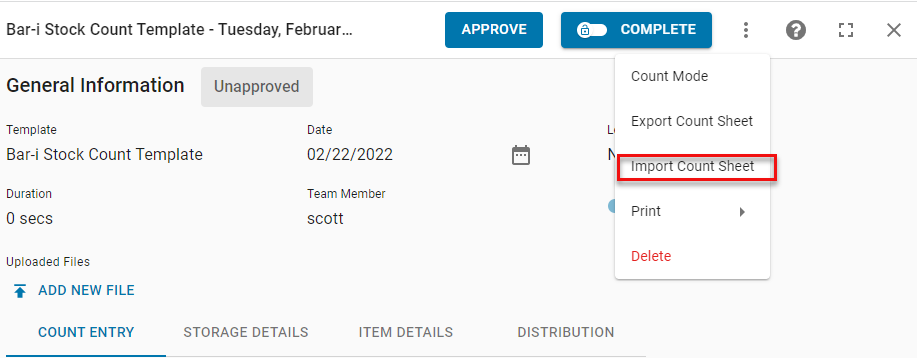
- Click the 3 vertical dots menu option again and select the option named “Import Count Sheet”.
- Follow the prompts to upload the correct inventory count file you exported from Bar-i
- Once the file has been imported successfully, you will notice the 'Quantity' column will show the values that were displayed in the “tot_count” column. Perform a final sanity check of the values before saving.
- To finalize the import, click Approve and then save and close the Inventory Count.
- Additional details on reviewing and approving an Inventory Count can be found here.
Additional Notes
- If any items (“alt_id”s) are present on the export file but are not present on a Purchased Item, the entire import will fail. A notification provided by the system will guide you on which items are missing so they can be added. Once all missing “alt_id”s are added, repeat the import process to perform a successful count import.
- As long as each “alt_id” can be matched to a Purchased Item in R365 (using the “Number (optional)” field), any item that is missing from the Inventory Count Template will be automatically added to the Stock Count.
- The instructions provided in this help article are relevant for users of R365 that have already set up their beverage inventory items. In this case the items already exist in R365 as Purchased Items. If you HAVE NOT YET SETUP THE PURCHASED ITEMS you have the option to use R365’s Import Tool to create the Purchased Items using a bulk import. This yields the advantage of setting items up quickly using their existing manufacturer barcodes. It also means that slower moving and high-end items that are not regularly purchased will be added in the system during initial setup, saving manual steps when performing your first physical inventory count. Please contact Bar-i for details.

-1.png)