
One way to identify a well-run bar is to evaluate their level of organization. In the overwhelming majority of instances, bars that are well-organized also function at a high level and are usually profitable. This makes sense on many levels. Keeping your bar organized shows that you have good attention to detail and it sets your staff up for success. This will pay huge dividends in every aspect of your business.
At Bar-i, we’ve conducted more than 8,000 inventory audits in 25 states over the past decade. We’ve seen it all during this time – from bars where you can’t find anything to bars where every item is always in its proper place. Through this experience, we’ve learned a lot of valuable tricks that have enabled us to help the bars we work with become better organized. In most instances, we’ve found that our clients experienced an improvement in performance as they adopted more effective organization strategies.
How Do I Know if My Bar Is Well Organized?
 A good metric to assess the effectiveness of your bar’s organization is to evaluate how many items you can count per hour while taking inventory. We have clients that can count approximately 500 items per hour. To maintain this speed consistently for an hour, your bar needs to be very organized.
While keeping your bar organized will speed up your counting process, there are other important benefits to maintaining this level of organization:
- Your bartenders will always be able to find products right away, allowing them to pour more drinks per hour during a busy rush
- It will be easy to identify when items need to be restocked, ensuring that you’ll always have enough product behind the bar throughout the shift
- When customers scan the back of the bar looking at your selection of a particular category of products (such as bourbons), it will be easy for them to identify the option they want to order
We recently posted a blog detailing organization best practices to optimize bar inventory process. Today, we’re going to look at bar organization from a different perspective. Below are 10 tips that will help ensure your operations are consistently running as smoothly as possible. While this will streamline your inventory efforts, it will also improve many other aspects of your business and set your staff up for success on every shift.
1. Label Wells with Black Electrical Tape and a Silver Sharpie
In order to maintain a well-organized bar, every item needs to have a fixed place. While your veteran staff members should know where everything goes, it may take a while for your newer employees to internalize these locations. Therefore, you need to label everything so that new employees will know where each item is supposed to go. This ensures that when the bar gets broken down, it will be easy to put it back together, even if you’re a new employee and still figuring out where every item is supposed to go.
We recommend using black electrical tape for the labeling process because it’s cheap, readily available at all times behind the bar, and durable (it’s easy to wipe clean). If you use black electrical tape in conjunction with a silver sharpie, it provides a cool look. This process also makes it easy to update the labeling if you change the order of bottles behind the bar.
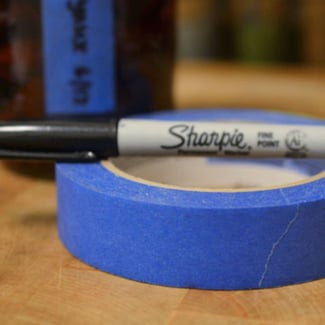
2. Label Liquor Store Shelves with Masking Tape and a Black Sharpie
 Keeping your storeroom bottles in fixed locations will make it much faster and easier to count them, especially if you use inventory software that contains a mapping system. The best way to ensure items stay in their proper place is to label them.
Many bars choose to use label makers in their storeroom, but there are several reasons why this isn’t the most effective approach:
- It’s common for the batteries in a label maker to die
- Label makers eventually run out of tape
- They get lost easily
It’s better to keep the labeling process simple by using masking tape and a black sharpie. These items are cheaper than a label maker, they’re always easy to find around the bar, and it’s much easier to update your labels if you change the order of bottles in your storeroom.
3. Number and/or Label Beer Lines
We’ve seen many bars with beer lines that look like a rat’s nest. This becomes increasingly problematic when you have a large tap system (20-30 disorganized beer lines can be quite chaotic to sort through). A simple first step to eliminating this issue is to label or number your beer lines:
- Fixed beer lines can be labeled since the product running through the line always remains the same. That being said, we prefer numbering all beer lines, even the ones with fixed products, because it provides a more streamlined and efficient process.
- Beer lines that are rotated regularly should always be numbered. This will eliminate the need to change the label every time you rotate the tap.
Numbering your beer lines will help with planning and prevent your staff from hooking up the wrong line to a new keg. If this occurs, you’ll need to bleed the line, which wastes beer and can take a lot of unnecessary time during a busy rush.
4. Use a Draft Beer Whiteboard if You Rotate Your Taps
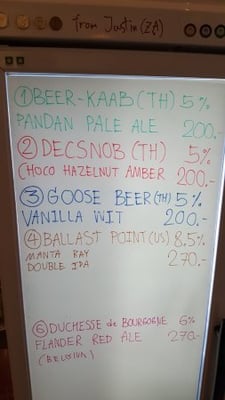 When you have a rotating tap list, it requires better organization. If you don’t plan your rotations carefully, it’ll be hard to track your products during the inventory process. We recommend using a draft beer whiteboard that is set up in the following manner:
- List all beer lines on the left side of the whiteboard
- List the current beer next to the line number
- On the right side of the board, list the next beer that will be coming onto that line
This planning will keep your rotating tap system running smoothly. Once you know which beer is going on a particular line next, we recommend taking this organizational tip a step further by creating the POS button ahead of time so that it’s already in place when you tap the new keg.
If you don’t have this level of planning, rotating beers on a regular basis becomes chaotic and ineffective. Using a whiteboard and planning your rotations in advance is crucial to ensuring that this process goes smoothly.
5. Use Keg Shelving in Your Walk-In Cooler
Many bars don’t have as much storage space as they would like. This is particularly true in tight walk-in coolers. Keg shelving can effectively double your space and cut down on clutter in your walk-in cooler.
If you have enough horizontal depth to your shelves, we recommend using two-deep shelving. This allows you to have a tapped keg and a back-up in front of it. This is the most efficient use of your space.
Some additional tips to keep in mind when you are installing keg shelves:
- You can either buy commercially pre-made shelving, or you can have your shelves custom-made to fit the exact dimensions of your walk-in. While custom shelves are a little more expensive, they’ll also more effectively optimize the space in your walk-in.
- If you’re going to use keg scales, make sure you have a flat, sturdy surface that will support your scales. Wire shelves can be hard to use with keg scales because it’s difficult to get the scale to fit properly on a wire shelf.
- Leave enough headroom above your shelves so that you can change the beer lines easily. You need about 4.5 inches of headroom to ensure there’s enough room to change the coupling on top of the keg without having to pull the keg out completely.
- While leaving proper headroom is important, you don’t want to leave too much of it on the bottom shelf. This will make the shelf above it too high, creating unnecessary challenges when trying to change a keg. If you stick to approximately 4.5-5 inches of headroom, you should be able to avoid this issue.
6. Mirror Your Coolers and Wells
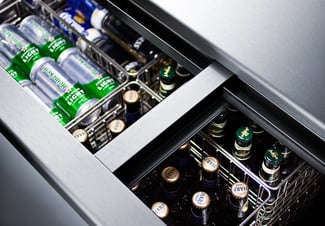 If you have two coolers and/or two wells that store the same items, each cooler/well should be set up in the exact same way. In other words, make sure all items are in the same order from left to right in each cooler/well.
When these areas mirror each other, it makes your operations faster and more efficient. Bartenders can work in any station and know exactly where each item is located. This makes it faster to grab beers out of your cooler or bottles out of your well since your bartenders won’t be hunting around to find a specific product.
Mirroring these areas will also provide other benefits:
- It will be easy for your bartenders to see when items need to be restocked
- You can use the order in the cooler to indicate qualities about the beers (for example, you can order your beers from light pilsners and blondes to heavier IPAs and stouts, allowing new bartenders to be able to talk more intelligently about the products before they acquire a sophisticated knowledge of craft beers)
7. Be Strategic about the Height of Your Beer Shelves
In your coolers behind the bar, your shelves should be appropriate for the height of the beer. You should have shorter shelves for canned beer and taller shelves for bottled beer.
In your storage area, your beer shelves should be constructed in a way that maximizes functionality. It often makes sense to stack cases of domestic beer on the floor because you generally run through them quickly. However, you should create shelving for your craft beers.
With smaller sales volume craft beers, you’ll generally have less back stock. If you don’t create shelving for these products, you end up stacking different products on top of one another. This forces your staff to constantly move these cases around to access the specific beer they’re looking for.
If you create beer case shelves that are the height of 2 cases, you can have a backup case on the bottom of the shelf and the broken six-packs on top. This makes it much easier to access these beers during a shift, and it’s much faster to count them when doing inventory.
8. Map Your Liquor Backups
As we mentioned earlier, every item behind the bar should have a set place. It often makes sense to have a spare bottle of your most popular liquors behind the bar. These backups are often kept in a small cupboard behind the bar.
In many bars, these bottles get crammed into the cupboard in a haphazard manner. This makes it difficult for your bartenders to trust that a specific item will be there when they need it, and they feel compelled to go to the storeroom to restock rather than hunt around the cupboard for a bottle that may or may not be there. This creates an inefficient process that can waste a lot of time during a busy rush.
We recommend keeping one to two bottles of your wells and your other 10-15 most popular liquor items in a cupboard so that these bottles are always readily accessible to your bartenders during a busy shift. It’s important to put a map on the inside door of the cupboard to ensure that these bottles always remain in the same position. This will allow your bartenders to easily access a backup bottle when they finish the one behind the bar.
Make sure to have this cupboard restocked as part of your bartenders’ closing side work duties. When the cupboard is being restocked, your bartenders can refer to the map to ensure the bottles are placed in the proper location. This will set your bartenders up for success on the next shift.
Having a disorganized backstock cupboard doesn’t help anyone. By taking a little extra time to plan out this area, it can become a useful resource that speeds up your bartenders’ process on a busy shift. This will allow them to pour more drinks during a busy rush, increasing your number of sales per hour.
9. Wine Shelves Should Hold 15 Bottles
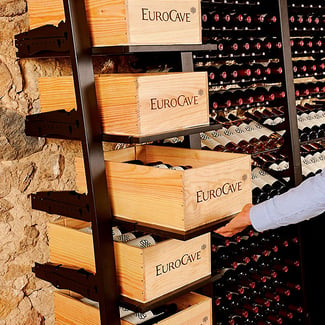 You should have dedicated spaces for your wine bottles in your storage area. For each slot where you keep a particular wine, you should ideally be able to hold 15 bottles of that wine varietal. This allows you to break down a full case when there are a couple of bottles of the old case left, making the entire new case accessible. This saves space and reduces the time required to restock wine bottles when your bartenders need them during a busy shift.
We recommend using three columns of five bottles. This is the most efficient way to quickly count wine bottles during inventory, and it will be easy for your bartenders to access the bottles during a busy shift.
10. Have a Dedicated Delivery Area
Establish a system where your delivery people know to drop all new items in a dedicated area where they won’t be blended in with your existing inventory. This will allow you to:
- Check to see that everything was delivered correctly
- Make sure you aren’t being overcharged for deliveries
- Send back any product that wasn’t ordered
If you can’t have your deliveries separate from your existing product, it’s going to be much harder to check them in, and you’ll end up getting overcharged in the long run.
Proper Organization Saves Time and Increases the Effectiveness of Your Daily Operations and Your Inventory Efforts
 There is a strong relationship between good organizational practices and the performance of your bar. In our experience, the bars that are well organized are also the bars that tend to have high performance numbers (all the drinks being poured are also being rung in, and liquor cost is lower).
We never see bars with a high accountability score that aren’t well organized. If you can’t get these basic organizational practices right, it’s going to be hard to get the more challenging aspects of your business, such as pouring signature cocktails quickly and correctly, right. In our inventory reports, we measure the effectiveness of your organization with our efficiency index. This will help you understand the changes that need to be made in order to improve your bar’s organization.
Proper organization is the building block of a profitable bar. It enables you to effectively measure what you’re doing, which improves the effectiveness of your bar inventory efforts. In addition, being well-organized allows you to take care of the counting tasks quickly so that your managers can spend additional time on the more important aspects of running your bar.
Bar-i’s Counting System Complements Effective Organizational Practices
At Bar-i, we have a new service specifically focused on expediting your counting system. It only costs $50 per month. If you like the results you’re achieving from your current inventory system but wish you could count inventory faster, this system may be an ideal solution for you.
To learn more about how Bar-i can help you streamline your processes and maximize your profits, please contact us today to schedule a free consultation. We serve bars and restaurants nationwide from our offices in Denver, Colorado.

-1.png)